Dun Shûma, The King's Fortress
| Level: | 150 |
| Size: | Fellowship |
| Cluster: | Legacy of Morgoth |
| Region: | The Valley of Ikorbân |
| Area: | Khûd Zagin |

- "The hostile forces of Ekhamât have claimed Dun Shûma, the hidden fortress of Menûn Shûma III. The ancient ruin is said to hold many historical treasures of the kingdoms of Shagâna. Though Bârshud has retreated, his Umûni still stand opposed to Mizâdi's quest to claim the Crown of Hamât."
Instance Overview
Level Range
This is a scaled instance with a minimum level of 150.
Location
This instance is part of the Legacy of Morgoth Instance Cluster.
It is available in the Instance Finder.
Difficulty
Enemy stats are altered depending on the tier of the instance:
 Enhancement -- Solo/Duo in Solo/Duo.
 Enhancement -- Tier 1 in Tier 1.
 Enhancement -- Tier 2 in Tier 2.
 Enhancement -- Tier 3 in Tier 3.
Estimated Duration
This instance usually takes about 20-30 minutes to complete on any tier, assuming that the group doesn't wipe on any boss.
Enemies
- Bosses 1 and 2:
- Boss 3: Zidunâm, the Serpent Reborn
Rewards
| Cloaks |
|---|
| Weapons | |||
|---|---|---|---|
| Item | Light Drop |
Medium Drop |
Heavy Drop |
| x | x | ||
| x | x | ||
| x | |||
| x | |||
| x | |||
| x | |||
| x | |||
| x | |||
| x | |||
| x | |||
| x | |||
| x | |||
| x | x | ||
| x | |||
| x | |||
| x | |||
| x | |||
| x | |||
| x | |||
| x | |||
| x | |||
| Essences | ||||
|---|---|---|---|---|
| Item | Solo/Duo | Tier 1 | Tier 2 | Tier 3 |
| x | x | x | ||
| x | x | |||
| Barter Items | ||||
|---|---|---|---|---|
| Item | Solo/Duo | Tier 1 | Tier 2 | Tier 3 |
| x | x | x | ||
| x | x | x | ||
| x | x | x | ||
| x | x | x | ||
| x | x | x | ||
| x | x | x | ||
| x | x | x | ||
| x | x | x | ||
| x | x | |||
| x | ||||
| x | ||||
| x | ||||
| x | ||||
| Legendary Item Advancement | ||||
|---|---|---|---|---|
| Item | Solo/Duo | Tier 1 | Tier 2 | Tier 3 |
| x | x | |||
| x | x | |||
| x | x | x | x | |
| x | x | |||
| x | x | |||
| x | ||||
| Random Incomparable Tracery | x | x | x | |
| x | x | |||
| x | ||||
| x | x | |||
| Housing | ||||
|---|---|---|---|---|
| Item | Solo/Duo | Tier 1 | Tier 2 | Tier 3 |
| x | x | x | ||
| x | x | x | ||
| x | x | x | ||
| x | x | x | ||
| x | x | x | ||
| x | ||||
| Pets | ||||
|---|---|---|---|---|
| Item | Solo/Duo | Tier 1 | Tier 2 | Tier 3 |
| x | x | x | x | |
| x | ||||
Deeds
Quests
Strategy Overview
Every roughly 80 seconds, the Boss opens a random Cage Door around the arena. While opened, a Ravenous Lioness is summoned every 30 seconds. The DPS players can ignore the cages, as any summoned Lionesses can be tanked on top of the boss (who doesn't move). Focus on killing the boss, as the adds should die to cleave damage; just make sure the Tank maintains aggro of the Lionesses.
The Boss occasionally casts Focused Shot, which targets a random player to deal distributed damage to all players along the line. This skill deals high damage, so take extra care to stand on the line. Note that the distributed hit extends further beyond the targeted player and the visible line. Pets can not soak the distributed hit. To counter this mechanic, have all non-Tank players stay tightly stacked up behind the Boss.
When the Boss reaches 50% Morale, she gains ![]() Shield of the Pride, taking no damage, and summons Iti-mêlim. Iti-mêlim must be killed before the boss can take damage again. Make sure to interrupt Iti-mêlim's inductions, as getting one off deals big damage and applies
Shield of the Pride, taking no damage, and summons Iti-mêlim. Iti-mêlim must be killed before the boss can take damage again. Make sure to interrupt Iti-mêlim's inductions, as getting one off deals big damage and applies ![]() Terrifying Roar to the fellowship. Watch for when the boss applies
Terrifying Roar to the fellowship. Watch for when the boss applies ![]() Marked for Death on a random player. Iti-mêlim will chase this player, so they should kite the Lion around the arena. The rest of the fellowship should use any run speed debuffs they have on Iti-mêlim so that he doesn't reach his target.
Marked for Death on a random player. Iti-mêlim will chase this player, so they should kite the Lion around the arena. The rest of the fellowship should use any run speed debuffs they have on Iti-mêlim so that he doesn't reach his target.
Once Iti-mêlim is killed, the boss can be damages again, but gains ![]() Rage of Loss, increasing her damage output. The fight proceeds as normal until the boss dies.
Rage of Loss, increasing her damage output. The fight proceeds as normal until the boss dies.
Tier 2
The boss will periodically deal a big fellowship-wide hit and inflict ![]() Snaring Shot on all players. Use your AoE cleanse skills to remove these ASAP. This effect is especially dangerous when Iti-mêlim is being kited, so the cleanses need to be prompt. If Iti-mêlim hits his marked player, he gains
Snaring Shot on all players. Use your AoE cleanse skills to remove these ASAP. This effect is especially dangerous when Iti-mêlim is being kited, so the cleanses need to be prompt. If Iti-mêlim hits his marked player, he gains ![]() Thrill of the Hunt corruptions, which need to be removed.
Thrill of the Hunt corruptions, which need to be removed.
Throughout the fight, the boss will summon sets of Charging Lionesses. When they spawn, giant red lines are created in the arena, predicting their path when they charge. Note that the lines do not extend across the entire arena, and the Lions will charge past where the lines end. Make sure to dodge the lines, and stay clear of them when the Lionesses begin charging.
When Iti-mêlim dies, the boss gains a new mechanic: ![]() Shoot to Kill. The fight is essentially a DPS race at this point, with the tiering bleed eventually becoming unbearable.
Shoot to Kill. The fight is essentially a DPS race at this point, with the tiering bleed eventually becoming unbearable.
Tier 3
The boss has a permanent aura, applying ![]() Lady of the Pride to nearby enemies, increasing their damage output. Additionally, when the boss opens Cage Doors, she now opens 2 at once. This means that there will be more Ravenous Lionesses, and they will be more dangerous. The strategy thus changes a litte bit.
Lady of the Pride to nearby enemies, increasing their damage output. Additionally, when the boss opens Cage Doors, she now opens 2 at once. This means that there will be more Ravenous Lionesses, and they will be more dangerous. The strategy thus changes a litte bit.
When the boss opens the 2 Cage Doors, swap to kill them immediately. The tank should move the Ravenous Lionesses away from the boss' aura on top of the Cage that the DPS are killing. Once the Cages are closed, switch back to killing the Boss while cleaving down the adds. If a Lioness is alive for too long, their ![]() Ravenous buff expires to grant them a major damage buff, so they need to be killed promptly. Because of the increased movement on this tier due to killing Cage Doors, it becomes more important to stack back up together when the boss does her Focused Shot distributed ability.
Ravenous buff expires to grant them a major damage buff, so they need to be killed promptly. Because of the increased movement on this tier due to killing Cage Doors, it becomes more important to stack back up together when the boss does her Focused Shot distributed ability.
There are a few other minor changes on tier 3. The boss occasionally inflicts random players with ![]() Sleep Shot, which should be cleansed via pot ASAP, as it paralyzes them. Iti-mêlim also gains a new skill where he briefly turns invisible and runs to stun someone. Watch out for his induction when he does this.
Sleep Shot, which should be cleansed via pot ASAP, as it paralyzes them. Iti-mêlim also gains a new skill where he briefly turns invisible and runs to stun someone. Watch out for his induction when he does this.
When Iti-mêlim is killed, ignore all Cage Doors and just stay on the boss. If there are too many Lionesses active at once, the Tank should begin kiting them around the arena.
The Weaponmaster has a few key mechanics to avoid. Step out of the ![]() Arrow Volley puddles when they spawn, and run away from the boss when he does Cleaving Strike and Dual Strike inductions. The boss will occasionally cast
Arrow Volley puddles when they spawn, and run away from the boss when he does Cleaving Strike and Dual Strike inductions. The boss will occasionally cast ![]() Whirling Death, where he spins around the arena for roughly 20 seconds; avoid the boss while he spins. Dodge the red line when the boss casts Throw Spear, and be careful not to step in the traps on the floor, as they root you in place via
Whirling Death, where he spins around the arena for roughly 20 seconds; avoid the boss while he spins. Dodge the red line when the boss casts Throw Spear, and be careful not to step in the traps on the floor, as they root you in place via ![]() Snapped (which can be cleansed to free yourself).
Snapped (which can be cleansed to free yourself).
When the boss reaches low health, he will begin to cast ![]() Reflective Shield, which reflects incoming damage back to players. While he has this buff, he can be FM'ed; either FM when he loses
Reflective Shield, which reflects incoming damage back to players. While he has this buff, he can be FM'ed; either FM when he loses ![]() Uncommon Fortitude, or hold off on dealing DPS for the duration of the buff. Only initial damage is reflected, so you don't have to worry about bleed damage being reflected.
Uncommon Fortitude, or hold off on dealing DPS for the duration of the buff. Only initial damage is reflected, so you don't have to worry about bleed damage being reflected.
Tier 2
The boss spawns more lines instead of just 1; take care to dodge all of them when they spawn in. When the boss does ![]() Whirling Death, he drops
Whirling Death, he drops ![]() Arrow Volley puddles under all players every 10 seconds. Move out of the puddles as they spawn, and fight the boss where there aren't any puddles. They despawn fairly quickly, so you don't have to be too careful with puddle placement. The boss will also target random players to be
Arrow Volley puddles under all players every 10 seconds. Move out of the puddles as they spawn, and fight the boss where there aren't any puddles. They despawn fairly quickly, so you don't have to be too careful with puddle placement. The boss will also target random players to be ![]() Pinned. Kill the Pinning Spear that spawns on top of them to remove the players from their paralysis. If the spear is not killed quickly, the pinned player will be defeated.
Pinned. Kill the Pinning Spear that spawns on top of them to remove the players from their paralysis. If the spear is not killed quickly, the pinned player will be defeated.
Tier 3
The boss will summon Explosive Fire Pots under random players. These enemies induct to deal huge damage to all nearby players, and apply a ![]() Flaming Ground puddle underneath them. Take care not to stand anywhere near them while they're inducting, and don't stand in the puddle once it drops. Also, in Tier 3,
Flaming Ground puddle underneath them. Take care not to stand anywhere near them while they're inducting, and don't stand in the puddle once it drops. Also, in Tier 3, ![]() Whirling Death will one-shot squishier players. Avoiding the boss' spinning maneuver is high priority. When you see him casting the induction, run away from him, as he will do an initial hit to anyone nearby.
Whirling Death will one-shot squishier players. Avoiding the boss' spinning maneuver is high priority. When you see him casting the induction, run away from him, as he will do an initial hit to anyone nearby.
Final Boss - Zidunâm, the Serpent Reborn
Before fighting the boss, he summons 3 mini-bosses: Methân Sai, Raghtâ Sai, and Kâlach Hûl. Note that Kâlach Hûl spawns in 20 seconds after the first two. These bosses occasionally grant removable poisons to players, which should be cleansed promptly. Kâlach Hûl summons Warrior Spirits and Archer Spirits as long as he is alive. Methân Sai applies ![]() Pinning Shot to random players, and Raghtâ Sai follows it up by running over to the targeted player to deal a potent frontal hit. Cleanse the debuff promptly and move out of the frontal cone. Kâlach Hûl also has a frontal induction, but turns while casting, so players need to move away from him. In general, the group should stay closer together in this phase, as Kâlach Hûl has a distributed hit that also knocks players back and applies
Pinning Shot to random players, and Raghtâ Sai follows it up by running over to the targeted player to deal a potent frontal hit. Cleanse the debuff promptly and move out of the frontal cone. Kâlach Hûl also has a frontal induction, but turns while casting, so players need to move away from him. In general, the group should stay closer together in this phase, as Kâlach Hûl has a distributed hit that also knocks players back and applies ![]() Lashing Strike.
Lashing Strike.
Methân Sai is an archer, and does not move. Tank everything on top of where he spawns, and kill Raghtâ Sai first, then Kâlach Hûl. Once all 3 are dead, the serpent boss spawns in shortly.
When the boss spawns in, the ghost of Theoden is summoned in the back of the room, along with 4 Fallen Rohirrim, who start at half health. The healer should immediately swap to healing up the Rohirrim. Whenever one of them is fully healed, Theoden grants ![]() King's Boon to the fellowship. When all 4 of them have been fully healed, Theoden activates and runs to hit the boss, inflicting
King's Boon to the fellowship. When all 4 of them have been fully healed, Theoden activates and runs to hit the boss, inflicting ![]() Might of Rohan. These two buffs together greatly shorten the duration of the fight, and the group should save their most potent damage cooldowns for after these effects are applied.
Might of Rohan. These two buffs together greatly shorten the duration of the fight, and the group should save their most potent damage cooldowns for after these effects are applied.
The boss has two main mechanics. First, he drops ![]() Caustic Poison puddles underneath all players approximately every 45 seconds. The arena's size will thus be decreased over the course of the arena; make sure not to stand in the puddles, as their damage component stacks. Second, he summons waves of 3 Serpent Spawn from around the room. It helps to have the group mostly stacked up on top of the boss so that the adds come directly to the Tank. They inflict
Caustic Poison puddles underneath all players approximately every 45 seconds. The arena's size will thus be decreased over the course of the arena; make sure not to stand in the puddles, as their damage component stacks. Second, he summons waves of 3 Serpent Spawn from around the room. It helps to have the group mostly stacked up on top of the boss so that the adds come directly to the Tank. They inflict ![]() Snake Bite to their target, which can be cleansed. These adds are not particularly dangerous, and can be cleaved down on top of the boss. Also, look out for the Boss'
Snake Bite to their target, which can be cleansed. These adds are not particularly dangerous, and can be cleaved down on top of the boss. Also, look out for the Boss' ![]() Serpent's Cry corruption, which should be removed.
Serpent's Cry corruption, which should be removed.
Tier 2
Methân Sai has an aura, applying ![]() Rallying Aura to nearby enemies. Rather than positioning everything directly on top of him, maintain a distance of 10 meters to ensure that other enemies do not inflict additional damage. The strategy remains unchanged, but this phase becomes significantly more challenging if frontal attacks are not avoided. The kill order is reversed, so players should target Methân Sai first, then Raghtâ Sai, and finish with Kâlach Hûl.
Rallying Aura to nearby enemies. Rather than positioning everything directly on top of him, maintain a distance of 10 meters to ensure that other enemies do not inflict additional damage. The strategy remains unchanged, but this phase becomes significantly more challenging if frontal attacks are not avoided. The kill order is reversed, so players should target Methân Sai first, then Raghtâ Sai, and finish with Kâlach Hûl.
Zidunâm targets players to inflict ![]() Serpent's Glare over the course of the encounter. A laser beam originates from the center of the arena and pursues the individual afflicted with the debuff. Players with this debuff should maintain a safe distance from the group while kiting the laser, as the laser inflicts
Serpent's Glare over the course of the encounter. A laser beam originates from the center of the arena and pursues the individual afflicted with the debuff. Players with this debuff should maintain a safe distance from the group while kiting the laser, as the laser inflicts ![]() Serpent's Glare on all players caught in its path.
Serpent's Glare on all players caught in its path.
The boss occasionally casts a long grey bar induction called Coil Strike, which will one-shot a random player. Once his ![]() Coiled bubble is removed, he can be FM'ed, cancelling his cast.
Coiled bubble is removed, he can be FM'ed, cancelling his cast.
When the Boss appears, position him close to the door. This will enable the healer to assist the Fallen Rohirrim without separating from the group. Gradually move along the edges of the arena during the fight to place puddles strategically. This approach ensures that the player affected by ![]() Serpent's Glare has ample open space to maneuver throughout the room. The group should be decently stacked so that the Puddles all spawn in the same general area. You shouldn't pixel-stack, though, as the Puddle damage stacks; be slightly spread out within your stack to avoid dying to puddle drops.
Serpent's Glare has ample open space to maneuver throughout the room. The group should be decently stacked so that the Puddles all spawn in the same general area. You shouldn't pixel-stack, though, as the Puddle damage stacks; be slightly spread out within your stack to avoid dying to puddle drops.
Tier 3
Puddles become much more prevalent in this tier. In phase 1, all of the removable poisons cast by the mini-bosses drop a ![]() Caustic Poison puddle upon cleanse or expiration. It is very important here to NOT use AoE cleanse skills. Players that gain the poisons should run to the edge of the room to pot them, as the puddles last a long time and can hamper the group's movement in phase 2. Some of the poisons are preventable: don't get hit by Kâlach Hûl's frontal hit, and interrupt Methân Sai's inductions.
Caustic Poison puddle upon cleanse or expiration. It is very important here to NOT use AoE cleanse skills. Players that gain the poisons should run to the edge of the room to pot them, as the puddles last a long time and can hamper the group's movement in phase 2. Some of the poisons are preventable: don't get hit by Kâlach Hûl's frontal hit, and interrupt Methân Sai's inductions.
In phase 2, the Serpent Spawn's ![]() Snake Bite poisons also drop
Snake Bite poisons also drop ![]() Caustic Poison puddles upon cleanse or expiration. These should always be on the tank, so they aren't as dangerous. The tank should cleanse them as they get them, and stand in the puddles for as long as possible, healing permitting. Others should run out of group to cleanse their bleeds, ideally nearby other previously-dropped puddles. The boss also summons the adds at a faster rate.
Caustic Poison puddles upon cleanse or expiration. These should always be on the tank, so they aren't as dangerous. The tank should cleanse them as they get them, and stand in the puddles for as long as possible, healing permitting. Others should run out of group to cleanse their bleeds, ideally nearby other previously-dropped puddles. The boss also summons the adds at a faster rate.
The boss gains a new mechanic where he applies the brief ![]() Jagged Scales bleed to the fellowship and drops a number of scales around the floor (like in the Weaponmaster fight). Take care not to stand in these, as stepping in one applies a stack of
Jagged Scales bleed to the fellowship and drops a number of scales around the floor (like in the Weaponmaster fight). Take care not to stand in these, as stepping in one applies a stack of ![]() Ruptured Armour. This makes kiting the
Ruptured Armour. This makes kiting the ![]() Serpent's Glare slightly harder, but the tier 2 strategy is still the best here.
Serpent's Glare slightly harder, but the tier 2 strategy is still the best here.
If your group is confident with this fight and desires a greater challenge, consider running this fight on "Challenge Mode"! In this challenge, don't heal up Theoden or the Fallen Rohirrim; this prolongs the duration of the fight and makes positioning harder.
Gallery
-
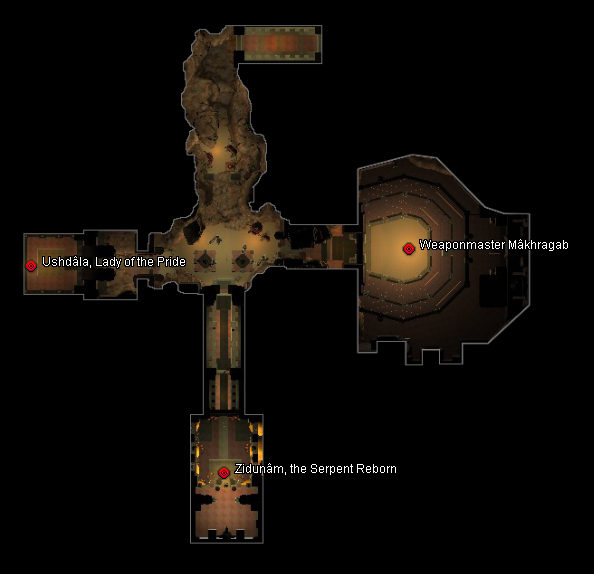 Map, including boss encounters

-
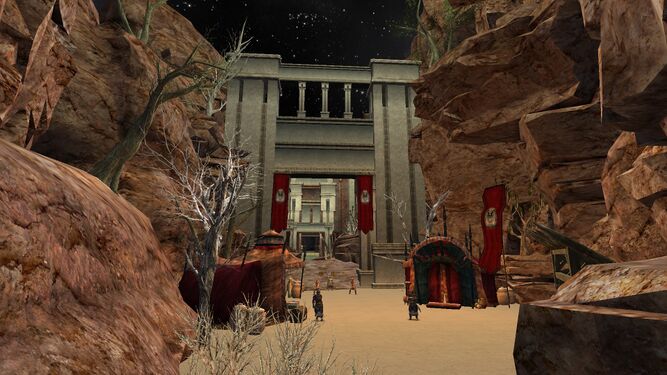 Entrance
 -
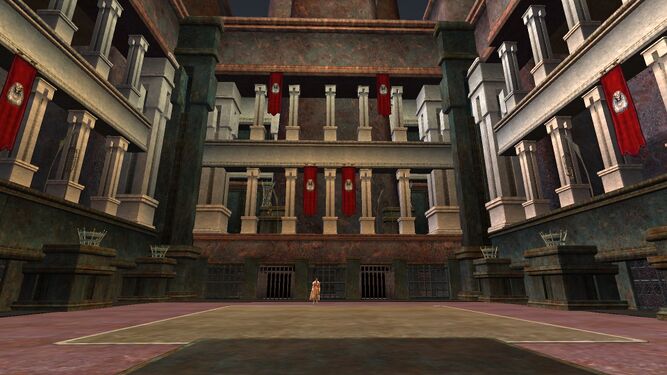
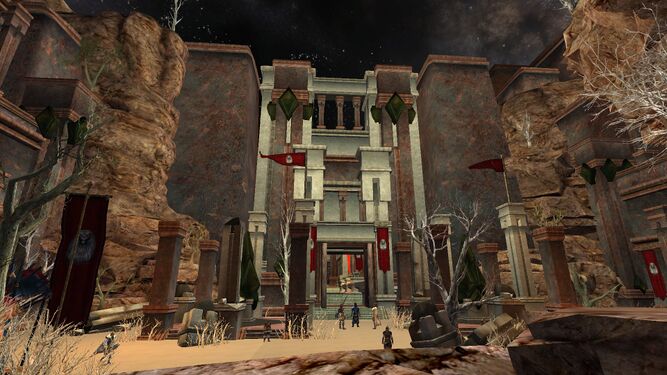 Central Courtyard
 -
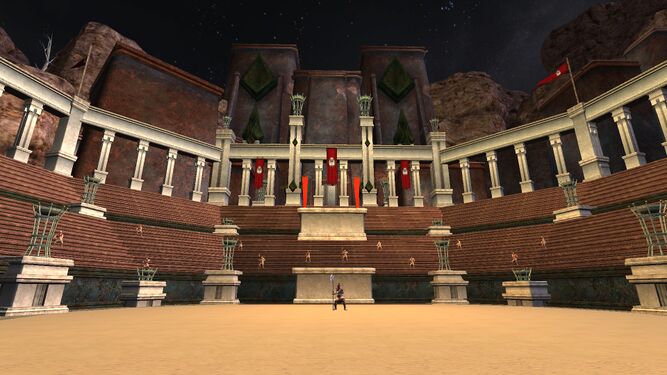 Weaponmaster's Arena
 -
 Ushdala's Arena
 -
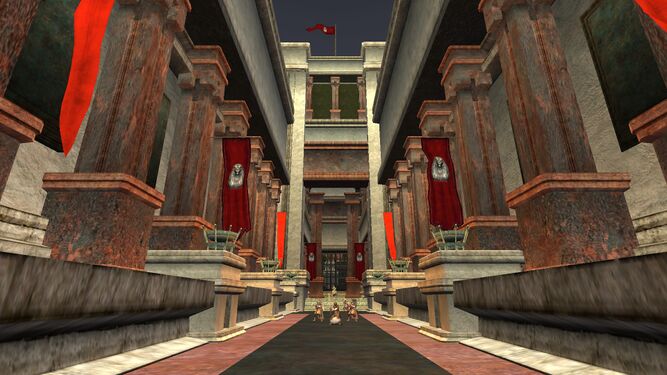 Corridor to the Final Boss
 -
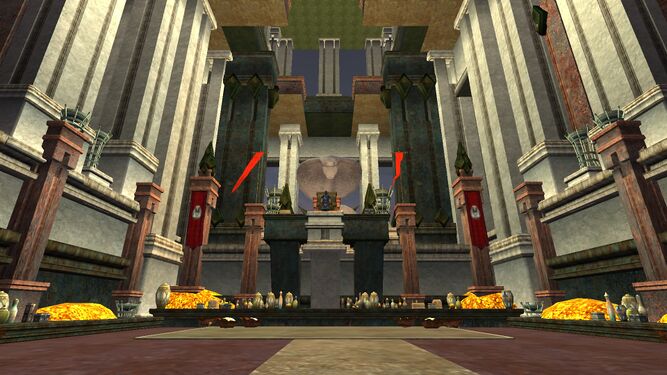 Final Boss Arena


