The Depths of Kidzul-kâlah
| Level: | 120 - 150 |
| Size: | Solo/Duo, Fellowship(6) |
| Cluster: | Vales of Anduin |
| Region: | Vales of Anduin |
| Area: | Gladdenmere |
| Location: | [1.0N, 67.8W] |

Location
- This instance is part of the Vales of Anduin cluster. The discovery deed required for entry is at [1.0N, 67.8W]
- "The dwarves left deep scars in the earth, and in their absence terrible things have moved into the dark pits. The waters of the Gladden merely halted their spread. With your aid I might end this threat... for good."
Difficulty Level
- This is a scaled instance, designed for a Solo/Duo or full fellowship from level 120 and up.
- It is available in the Instance Finder.
- Estimated completion time is between 20 and 30 minutes (solo/duo, tier 1).
Quests
Introduction and Instance quests:
The Depths of Kidzul-kâlah Quests These quests are related to the World Instance: The Depths of Kidzul-kâlah.
Deeds
Known Deeds for this instance (usually bestowed upon first entrance) include:
- Discovery: The Depths of Kidzul-kâlah
- The Depths of Kidzul-kâlah -- Tier 1
- The Depths of Kidzul-kâlah -- Tier 2
- The Depths of Kidzul-kâlah -- Tier 3
- The Depths of Kidzul-kâlah -- Tier 3 -- Leading the Charge
- Dances with Tentacles
- Dances with Tentacles (Tier 2)
- Dances with Tentacles (Tier 3)
Creatures
These mobs are encountered within The Depths of Kidzul-kâlah:
- Click [+] to expand a list of creatures.
Instance Overview
- First Boss: Gultháva, Maiden of the Gladden
- Second Boss: The Grasping Maw
Walk-through and Tactics
- Tier 1
Boss 1: Gultháva
On entering the instance, you immediately walk into the room for the first boss fight, the Test of the Maiden. Gultháva has a periodic frost damage DoT she'll put on you at random, signified by a blue eye. On expiration, the eye will drop a puddle with a significant DoT effect where the affected person was standing ("I call the waters!"). Gultháva also has a significant damage buff she will put on herself ("Spirits of the Gladden, hear my call!"). Otherwise this is a straightforward fight- dps her and her occasional Water Spirit summons until she concedes.
After the fight, follow Gultháva deeper into the mines until you come to a large pool where the Grasping Maw fight begins.
Boss 2: The Grasping Maw
Much like the Watcher in the Water, the Maw has one large body with mouth and eyes and a bunch of tentacles. Some of these do different things; the Biting Tentacles bite. Quite hard. Most of the fight involves tanking these while dealing with the other tentacles. The Spewing Tentacles throw heavy DoTs while the Spitting Tentacles throw damaging puddles. The Spewing and Spitting are generally weaker than the Biting and can do heavy damage if left unchecked, so take them down quick and then wear down the Biter until you can target the main body of the Maw, then wear down that until it flees deeper into the mines. You do this multiple times, following Gultháva as she lowers the waters and fighting off the Nameless trash in between bigger fights with the Maw- and you will be in combat the entire time. Wiping in this phase will send you all the way back to the top.
- Tier 2
- Tier 3
Tips
Sometimes Elrond and Glorfindel will get stuck after the first battle with the boss. They get stuck at the bottom of the stairs and won't continue. To solve this, jump back up the boulders and slowly walk down several different ways and eventually one or both will follow your lead to the path below. Trying to use the horn to call them wont work cause you must be very far away for the horn to work. If you can defeat the next boss encounter without them, you can then call the missing guys once you are far enough away from their stuck location. Elrond and Glorfindel can also be dismissed with the command /pet releaseall and resummoned. Elrond and Glorfindel also will not scale with the instance- they are always level 120. This can make it difficult even in solo/duo mode at higher levels, as you can't rely on them to take some of the attention in the boss fights. Their heals are underpowered, most of their attacks will be deflected entirely, and their health pools won't support holding aggro for very long.
Challenge
<Describe any challenge mode>
Rewards
This instance has two chests. Each has a unique version for the solo instance and tiers 1 through 3. Chest locks reset daily at 3:00 a.m. server time. Depending on the Tier of the instance, the rewards below have higher stats.
 Swift Coif of the Maw
 Dextrous Gold Bracelet of the Maw
 Meaningful Locket of the Maw
 Topaz Gold Ring of the Maw
Maps
-
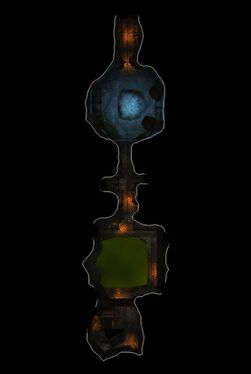
Upper-level
-
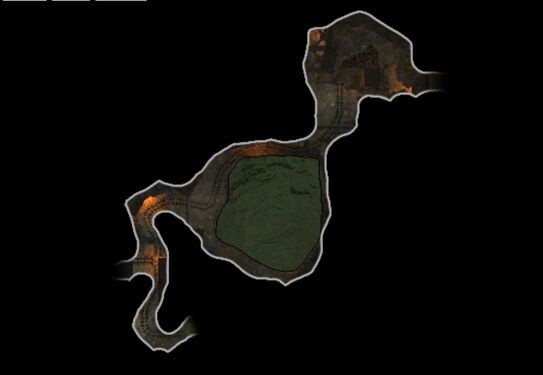
Mid-level
-
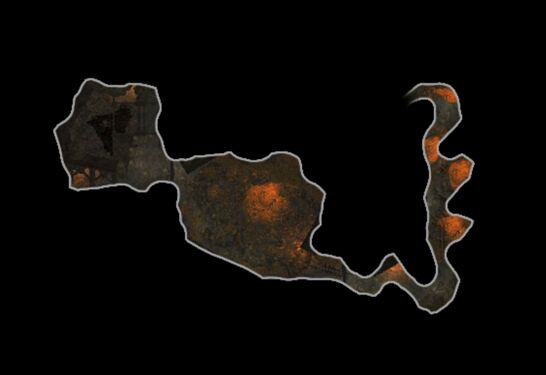
Lower-level
Gallery
[[File: < FILE NAME > .jpg|350px| < FILE NAME OR DESCRIPTION > ]] OR


