The Hiddenhoard of Abnankâra
| Level: | 140 |
| Size: | 12-person Raid |
| Cluster: | Fate of Gundabad |
| Region: | Gundabad |
| Area: | Clovengap |
| Location: | [34.2S, 124.9W] |

Location
This 12 person raid is part of the Gundabad Instance Cluster. It was released on February 24, 2022.
It is available in the Instance Finder after completing Discovery: The Hiddenhoard of Abnankâra.
Difficulty Level
This is a non-scaled instance, designed for a Raid (12 players) level 140 and up.
Estimated completion time is 1-2 hours.
Percentage Rating penetration buffs on mobs scale with difficulty tier, quite similar to other instances, but also somewhat different. See Stat caps for details.
Raid Locks
This raid has raid locks for different tiers:
- Tier 1 — resets three times per week:
- Monday at 3:00 a.m. server time
- Thursday at 3:00 a.m. server time
- Saturday at 3:00 a.m. server time
- Tier 2–5 — resets weekly on Thursday at 3:00 a.m. server time
Quests
- [140] The Hiddenhoard Revealed
- [140] Raid: The Hiddenhoard of Abnankâra (Weekly)
- [140] The Hiddenhoard of Abnankâra -- Tier 1
- [140] The Hiddenhoard of Abnankâra -- Tier 2
- [140] The Hiddenhoard of Abnankâra -- Tier 3
- [140] Into the Hiddenhoard (Tier 1)
- [140] Into the Hiddenhoard (Tier 2)
- [140] Into the Hiddenhoard (Tier 3)
Deeds
- Discovery: The Hiddenhoard of Abnankâra
- The Hiddenhoard of Abnankâra -- Tier 1
- The Hiddenhoard of Abnankâra -- Tier 2
- The Hiddenhoard of Abnankâra -- Tier 3
- The Hiddenhoard of Abnankâra -- Tier 4
- The Hiddenhoard of Abnankâra -- Tier 5
- The Hiddenhoard of Abnankâra -- Leading the Charge
- The Hiddenhoard of Abnankâra -- Slayer of the Frost-horde
- The Hiddenhoard of Abnankâra -- Explorer of the Hiddenhoard
Creatures
These mobs are encountered within The Hiddenhoard:
- Click [+] to expand a list of creatures.
Instance Overview
- First Boss: Kvethár, Armód and Threkvegg
- Second Boss: Thrall-lord Dushtalbúk
- Final Boss: Hrímil Frost-heart
Walk-through and Tactics
Trash 1
Before getting to boss 1 there are two add pulls. The giants do knockbacks, so the tank pulls them to the entrance of the raid to avoid being thrown off the bridge. During the fight people will get a purple eye. This means the Tamed Frost-Bear will aggro that person. On tier 2+ the Ice-giant warrior pops a corruption that reflects damage.
Boss 1
The first boss fight consists of three ice giants: Kvethár, Armód and Threkvegg. They will tier up a bleed on the tank, so you will need to tank swap. (Although on tier 1 you can get away with solo tanking it.) Kvethár is responsible for the AoE punt and the blizzard. So you will want to focus Kvethár first and position yourself such that you do not get punted off the platform. The tanks should stand with their backs against the gate while the rest stands tightly behind Kvethár. Kvethár will put a yellow eye and a blue eye on random people. If someone gets a yellow eye they need to stand between a gate and Kvethár to avoid being thrown of the platform. If someone gets the blue eye move to entrance and you will drop a puddle when it expires.
After Kvethár dies the fight becomes trivial as there are no other significant mechanics (on tier 2). Higher tiers may introduce additional mechanics.
Trash 2
After boss 1, up the ramp there are three trash groups. On the right and left there are groups containing one Cold-drake, one Cold-worm, and a couple Cold-whelplings on each side. The middle group contains one Cold-drake, two Cold-worms, two Ice-giant Warrior, and two Ice-giant Seers. It's recommended to focus the worms and drake first, then the warriors and seers, and finally any whelplings. The worms should be focused first as they give a stackable bleed that should be removed as often as possible. The drake has a strong frontal attack and an aura which damages players nearby, so the tank should face the drake away from the main group. Whelplings drop a puddle on the ground upon defeat, and can be AOE'd down while focusing on the prioritized targets. Seers and Warriors have a knockback effect, so bringing the raid up the final ramp may be effective to prevent any players from being knocked off the cliff. Inside there are a lot of Hobgoblins before reaching boss 2. Make sure to kill in the following order: Enthralled Frost-Caller, Enthralled Black-Arrow, Enthralled Warrior, Cold-Drake, Enthralled Sapper, Cold-Worm, Cold-Whelpling, Enthralled Guardian. The off-tank pulls the guardian (and possibly the drake) away and when everything is dead, it can be dealt with.
Boss 2
In the second boss fight you face Thrall-lord Dushtalbúk. Position yourself such that you don't get punted into the spikes as they are instant death. Note that you are in complete control of this fight as all triggers are based on a morale threshold, there are no timers until reaching the final 20%. The following thresholds only trigger the first time they are reached. If Dushtalbúk heals and you dps through a threshold again, it will not trigger a second time. Throughout the fight you will need to tank swap on tier 2+ as Dushtalbúk will tier up a mitigation and incoming healing debuff on its target.
At 90%, 60% and 30% Dushtalbúk will summon adds, similar to the ones you have faced before reaching this fight:
- Enthralled Frost-Caller: Top priority. They heal and spawn totems such that you cannot block/parry/evade and debuff your mitigations by 25%.
- Enthralled Black-Arrow: On tier 2+ these become dangerous after stacking several +100% damage corruptions. Keep them mezzed or remove corruptions until you are ready to deal with them.
- Enthralled Warrior: On tier 2+ they have a corruption that reflects your damage, be careful when hitting them.
- Enthralled Sapper: Drops fire puddles on the ground, don't stand in them.
- Cold-Worm: Applies bleeds and is responsible for the frenzy buff on its allies that increases outgoing damage and makes them attack random targets.
- Cold-Whelpling: Drops frost puddles on the ground when killed, don't stand in them, also hits random targets.
- Enthralled Guardian: Decreases the incoming damage of its allies, make sure they are not near your target.
- Enthralled Frost-Caller: Top priority. They heal and spawn totems such that you cannot block/parry/evade and debuff your mitigations by 25%.
The main tank grabs the adds while the off-tank holds the boss and the Enthralled Guardian(s) away from the group. On tier 2+ make sure to keep swapping tank roles before your debuff tiers up too high and the off-tank holding the boss will take very little damage allowing your healers to focus on the main tank for the add phase. The sappers and whelplings can be safely AoE'd together at the end, just make sure to keep moving out of puddles. If the group focuses adds, the boss should not phase before they are killed.
At 75%, 50% and 25% Dushtalbúk will call 'Echoes of the Greymauls'. The spikes on both sides of the room come down and there is a protective aura behind the pillars where you can hide from Dushtalbúk. After he finishes his skill you need to return to the centre quickly before the spikes come back up. (On tier 1 this mechanic can be ignored as the skill only hits for about 400k.)
At 20% Dushtalbúk heals himself back to 40% and he gains the Warlord's Wrath buff. Make sure all your big cooldowns (e.g. Oathbreakers, Ancient Craft) are ready before phasing him through this threshold. On tier 1 the Warlord's Wrath buff cannot tier up, so the remainder of the fight is trivial. However, on tier 2+ the dps race starts: every 15s he gains another tier of Warlord's Wrath, increasing his outgoing damage by +20% and gaining -10% incoming damage per tier, capping out at +200% outgoing damage and -99% incoming damage after 150s. At this point he will take virtually no damage and likely one shot his target. To give you more time to kill Dushtalbúk you can drop a chandelier on him to reset his Warlord's Wrath buff. There are 4 chandeliers in the room, one in each corner. If your ranged dps hits the brittle chains the chandelier will drop down. Ensure to position Dushtalbúk below the chandelier you are killing.
Boss 3
When starting the fight it is best for the group to stand back as Hrímil starts with a massive hit. On tier 2+ even your tank will need to use a defensive cooldown. You will also need to tank swap on tier 2+ as Hrímil will tier up a mitigation and incoming healing debuff on her target. After getting Hrímil down to 85% you will enter the Mind of the Frost-heart.
The first pull in the Mind of the Frost-heart includes 10 Maddened Nurnhoth, 1 Mordath Taskmaster, 2 Condemned trackers and 1 Condemned Defiler. Ideally you CC the defiler and the trackers, but definitely the defiler as it applies an AoE silence that spreads to other party members if cured and also heals its allies. You should focus the Taskmaster and heavily AoE the Maddened Nurnhoth, they should be dead when the Taskmaster reaches 70%. At 70% of its health the Taskmaster spawns 3 Enslaved Nurnhoth. From this point make sure you single target the Taskmaster and stop all AoE (even if there still are Maddened Nurnhoth). The Enslaved Nurnhoth will despawn when the Taskmaster dies. Make sure not to kill any Enslaved Nurnhoth yourself as they will explode on death, likely wiping the group. After the Taskmaster dies you can focus the defiler and it should be straightforward to clear the remainder of this pull.
The next pull has 2 Condemned Trackers, 2 Condemned Warriors, 1 Condemned Defiler and 1 Mordath Overseer. (It also has 2 Mordath Taskmasters, but they won't come down the stairs, allowing you to deal with them later.) Focus the Overseer as it puts a -50% incoming damage buff on everything else and again CC the defiler (and potentially trackers). Once the overseer dies, kill the defiler and clear up. You can then move up the stairs to deal with the 2 Mordath Taskmasters. They will be straightforward as long as you don't AoE their Enslaved Nurnhoth spawn.
Finally you will face the Echo of Winter. This is a frost grim with a big frontal, but if you stand behind it you will be fine. You will be out of combat after defeating it.
Next you face 2 Ice-Beasts and 4 Ice-Crawlers. Simply AoE them all. (Focus the beasts as they have more morale.)
An Elder Cold-drake, Cold-worm, 2 Frost-bound Hobgoblins and 2 Frost-bound Squall-shapers constitute the next pull. Simple AoE them all focusing the Elder Cold-drake. When the Elder Cold-drake puts a blue eye on someone, this person should move behind the drake to stand with the tank. (It will wipe the group if they stay in the group as it's a massive frontal.)
The next pull is similar but with an extra Cold-worm and Frost-bound Hobgoblin. Again if you get a blue eye make sure you are on the opposite side of the drake than the group.
Finally clear up the Echo of Winter. It should give you no trouble as long as you don't pull before you cleared the previous pull.
You will run through the hallway a bit until you see the next group. There will be an Elder Cold-drake, 2 Ice-giant Warriors, 2 Enthralled Frost-callers and 4 Cold-Whelplings. You want to focus the Frost-callers as they heal, debuff your mitigations and have relatively low morale, next the drake and finally the giants. The Whelplings will die to your AoE so move out of their puddles they leave on death and again be alert for the blue eye from the drake. Finally you can engage the Echo of Winter on the central platform and the gates will open.
Now you will face Hrímil herself at the end of the Mind of the Frost-heart. Hrímil will perform the Freezing Breath attack. Make sure you have the setting to display induction bars on to easily notice it. On tier 1 she will only target the tank with it, but on tier 2 she can target any member in the group. This is a massive hit, but she is frozen in place so everyone can run behind her while she is inducting to avoid the frontal. The frontal cone is pretty narrow, so one could also move off to the side, depending on what's easier in the moment. On tier 2+ she also gains a roar attack that puts a fear on everyone in the group, debuffing maximum morale by approximately 30%. You will want to clear it as soon as possible.
Every 20% from 90% to 30% she will call adds to aid her.
- At 90% she will call Ice-giants. These are 2 Ice-giant warriors, 2 Ice-giant hunters and on tier 2+ also 2 Ice-giant seers.
- At 70% she will call orcs. These are 4 Enthralled Warriors, 4 Enthralled Black-arrows and on tier 2+ also 2 Enthralled Frost-callers. This is similar to boss 2. Focus/CC the Black-arrows first. Then deal with the Frost-callers and finally clear up the Warriors (remember to remove their reflect corruption on tier 2+).
- At 50% she will call drakes. These are Cold-whelplings and on tier 2+ also Cold-worms. Keep the worms away from Hrímil so they don't give her the frenzy buff, which increases her damage and makes her attack a random target. Focus the Cold-worms and clear up the whelplings after.
- At 30% she will call Ice-giants, orcs and drakes.
At 20% she will green out, Nain will hit her and the fight continues. On tier 1-2 nothing happens in this final phase, but it is likely higher tiers introduce another mechanic. She will be defeated when you get her down to 5%.
Tips
< General tips for all levels >
Rewards
On tier 1 and 2 the bosses always drop either a gear piece or an essence box. On tier 3 you are guaranteed to get a gear piece and additionally have a chance to get an essence box.
Boss 1 and 2 will additionally drop an Enhancement rune, while Hrímil always drops a Tracery, with increasing quality for higher tiers. (On tier 3 boss 2 and 3 reward an additional tracery.)
For all bosses the chests may additionally drop a heritage rune on all tiers, with increasing amounts of item xp for higher tiers.
Cosmetic rewards are dropped exclusively by Hrímil, they are not affected by tier. Looting a cosmetic is independent of the other loot.
Very rarely Hrímil may drop a Remmorchant Stat Tome Box, Universal Solvent, Universal Optional Crafting Ingredient or Shattered Gundabad Tracery, with increasing chances on higher tiers. On tier 3 she may drop a Cracked Gundabad Tracery.
The following table provides an overview of the sources for set items:
| Set Items Overview | Thyrstáth's Tribute | Armaments of Ibkêrmazal | Hrímil Frost-heart's Hoard |
|---|---|---|---|
| Tier 1 | |||
| Tier 2 | |||
| Tier 3+ |
These rewards can be exchanged for the right set at the Overseer in Zidir-nesad, the Steepset.
Although rewards are grouped by armour type in the following tables, rewards will only include items that are usable by the character's class, i.e. Brawlers won't receive a sword and Minstrels won't receive a bow. Items that drop for all classes are listed in the Common table.
Boss 1
| Thyrstáth's Tribute - Tier 1 - Common |
|---|
| Thyrstáth's Tribute - Tier 2 - Common |
|---|
| Thyrstáth's Tribute - Tier 3 - Common |
|---|
Boss 2
| Armaments of Ibkêrmazal - Tier 1 - Common |
|---|
| Armaments of Ibkêrmazal - Tier 2 - Common |
|---|
| Armaments of Ibkêrmazal - Tier 3 - Common |
|---|
| Random Tracery, level 131, incomparable |
| Armaments of Ibkêrmazal - Tier 4 - Common |
|---|
| Random level-adjusted Tracery, incomparable |
Boss 3
| Hrímil Frost-heart's Hoard - Tier 1 - Common |
|---|
| Random Tracery, level 131, incomparable |
| Hrímil Frost-heart's Hoard - Tier 2 - Common |
|---|
| Random Tracery, level 131, incomparable |
| Hrímil Frost-heart's Hoard - Tier 3 - Common |
|---|
| Random Tracery, level 131, epic |
| Random Tracery, level 131, incomparable |
Maps
-
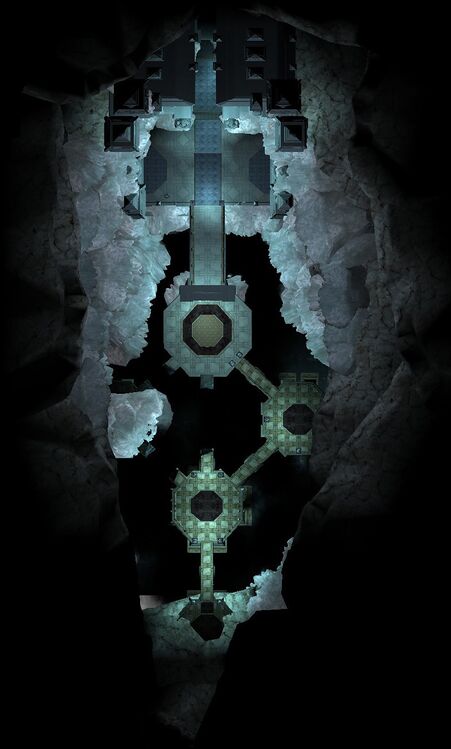
Entrance, First boss encounter, after boss adds
-
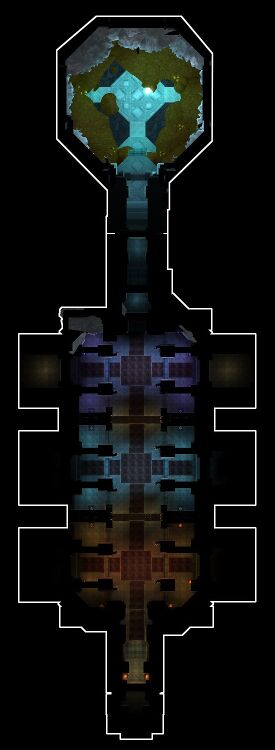
Inside, Second boss room, Third boss start location
-

Gauntlet, Third boss fight arena


Gallery
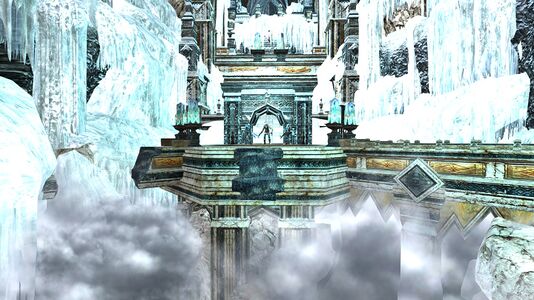
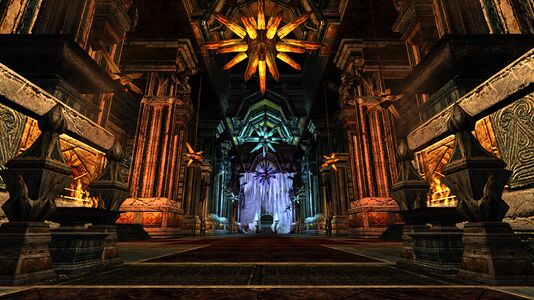
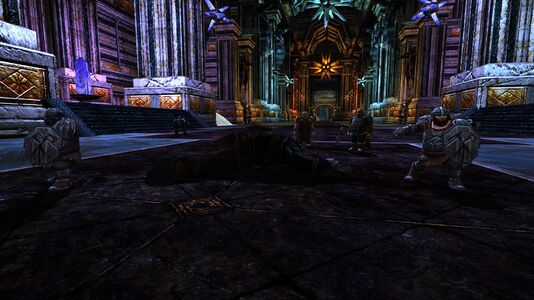
-

Durins Company at the entrance
-
Kvethár, Armód and Threkvegg
-
-
Thrall-lord Dushtalbúk is defeated


| Spoiler Alert |
|---|
|


![[34.2S, 124.9W]](/wiki/File:Clovengap_map.jpg)
| Mount Gundabad Instances
| ||
|---|---|---|
| Small fellowship: | Den of Pughlak • Assault on Dhúrstrok | |
| Fellowship: | Adkhât-zahhar, the Houses of Rest | |
| Raid: | The Hiddenhoard of Abnankâra | |
| Settlements and Landmarks of Clovengap
| ||
|---|---|---|
| Settlements: | Bazanmanar • Hagbuth | |
| Landmarks: | Amgaruslun • Anatrâd • Bazanmanar • Burmumekhem • Danakh-khêj • Dashât-zahar • Frósthel • Garânashmar • Hagbuth • Kurdushâlak • Maranazhâr • Min Návaid • Nâtatharr • Skarashulg • Stókkset • Tharrkirîn | |
| Interiors: | Min Návaid | |
| Instances: | The Hiddenhoard of Abnankâra | |