Gwathrenost, the Witch-king's Citadel
| Level: | 140 |
| Size: | 12-person Raid |
| Cluster: | The Return to Carn Dûm |
| Region: | Angmar |
| Area: | Ephel Angren |
| Location: | [72.7N, 31.2W] |

- "Once the seat of the Witch-king of Angmar, the dread citadel of Gwathrenost casts a long shadow upon the city of Carn Dûm. All but abandoned after the Steward of Angmar was deposed, the remnants of the Iron Crown have crept forth from the shadows, seeking to master a lost artifact of the Witch-king and reclaim dominion over the realm."
Location
This 12 person raid is part of The Return to Carn Dûm Instance Cluster. It was released on May 3rd, 2023 with Update 35.1.2.
It is available in the Instance Finder.
Difficulty Level
This is a non-scaled instance, designed for a Raid (12 players) level 140 and up.
Estimated completion time is 1-2 hours.
Percentage Rating penetration buffs on mobs scale with difficulty tier, quite similar to other instances, but also somewhat different. See Stat caps for details.
Raid Locks
This raid has raid locks for different tiers:
- Tier 1 — resets three times per week:
- Monday at 3:00 a.m. server time
- Thursday at 3:00 a.m. server time
- Saturday at 3:00 a.m. server time
- Tier 2–5 — resets weekly on Thursday at 3:00 a.m. server time
Quests
- [140] Angmar Reborn, Chapter 4
- [140] Gwathrenost: Freeing the Taken
- [140] Gwathrenost: Reclaiming History
- [140] Gwathrenost: Symbols of the Iron Crown
- [140] Raid: Gwathrenost, the Witch-king's Citadel (Weekly)
Deeds
Creatures
These mobs are encountered within The Citadel:
- Click [+] to expand a list of creatures.
Instance Overview
- First Boss: Gurkrak
- Second Boss: Castellan Obáshurz
- Third Boss: High Chieftain Claghórd & High Priestess Ásachal
- Final Boss: Shard of Tauressar
Walk-through and Tactics
First Boss (Gurkrak)
...pending
Second Boss (Castellan Obáshurz)
.jpg)
Phases
- 90% Oath-sworn attendants
- 75% Lights
- 65% Oath-sworn attendants
- 50% Lights
- 40% Oath-sworn
- 25% Lights
- 20% Hope Wipe and Fury
Enrages
- The effect
 Unstoppable will be active on Castellan Obáshurz after:
- Tier 2: After 9 min Boss enrages.
- Tier 3: After 8 min Boss enrages.
@100% Boss health
- This is a 2 tank stratigy: Guardian Tank and Off Tank.
- Boss will have role play. Last line is "It seems I shall have to entertain you myself."
- Open with maximum DPS, need to blow up boss before he does it's first Fear. This means Oathbreaker's Shame, Burn Hot, banners, tar, etc.
- Guardian tank will hold the boss until the adds spawn.
Attendants
- Spawn at 90%, 65%, 40%.
- IMPORTANT: DO NOT stand by the spawn points.
- If killed, will drop puddles causing to inflict
 Writhing Essence upon you, if you stand in them.
 - Off Tank picks up the boss, waits for the adds to spawn and then drags them to the Boss Tank Area.
- Guardian will War-chant in the middle of the room (make sure you have rank 5 of War-chant), hit Thrill of Danger, and when Guardian gets to the Add Tank Area turn and hit Challenge. Once the adds are on you hit Guardian's Pledge to survive the cleave bleeds. Stand in tank in one location. Guardian will require healing support.
- Loremaster will Bane Flare the adds when they group up in the center of the room.
- Burglar will stun (Trick: Dust in the Eyes + Improved Startling Twist) all attendants as soon as Bane Flare wares off to give the Guardian max time to position.
- Kill all the attendants. One Champion is a MUST on this fight because of the incoming 25% damage the attendant take.
- When there is only one add still up, Guardian will pull the boss to the South and into the green puddles.
- Back on Boss.
Lights
- Spawn at 75%, 50%, 25%
- Where the lights spawn is completely random.
- Important to grab the nearest lights first (which would be East and West)
- ORDER: East, West, North, South. Reason you decide this up front is because melee will need to run to the lights.
- All the LIGHTS MUST die on T3+ or you'll hit the enrage timer.
- If the LIGHTS reach the boss, they heal him up substantially and turn into Attendants.
- The buff on both tanks will drop OFF during this phase as the boss is inducting.
- As the boss nears the end of it's inducting time, Guardian tank drags the boss to the North, to get the boss into position.
- Typically right after light the boss will do fear.
- If you move to the Safe Hide Zone while the boss is doing his fear attack, you'll get a
 Shadow debuff.
 - With boss on North, the DPS can line up in the Safe Hide Zone and continue to pummel the boss, thus not loosing DPS time.
Rinse and repeat 2 more times.
Fury
- At 20% the boss will do a hope wipe and go into
 Fury of the Castellan. Healers will hit tokens.
 - Tanks MUST kite the boss at this time. In order to NOT break line of site with DPS and healers, the tank will run circles around the platform.
- Stagger run speed boosts:
- Tanks go first
- Beorning rush next
- Red Captain boost
- Rinse and repeat
- Can use a pet taunt to help out if it looks like the tank is going to get caught.
Purple Eyes
- Purple eyes MUST be dropped out of group by the East or West gates.
- DO NOT drop puddles on top of each other, because on T3+ two puddles will instant kill 2 players and anyone else in the puddle with them.
Credits to Miloascape.
Third Boss: (High Chieftain Claghórd & High Priestess Ásachal)
...pending
Final Boss: (Shard of Tauressar)
...pending
Rewards
Boss 1 - Gurkrak
| Gurkrak's Chest - All Tiers |
|---|
Boss 2 - Castellan Obáshurz
| Obáshurz's Chest - All Tiers |
|---|
Boss 3 - High Chieftain Claghórd & High Priestess Ásachal
| Ásachal and Claghórd's Chest - All Tiers |
|---|
| 5 |
Boss 4 - Shard of Tauressar
| Relics of Gwathrenost - All Tiers |
|---|
| 10 |
| Random Traceries (different quality) |
Maps
-
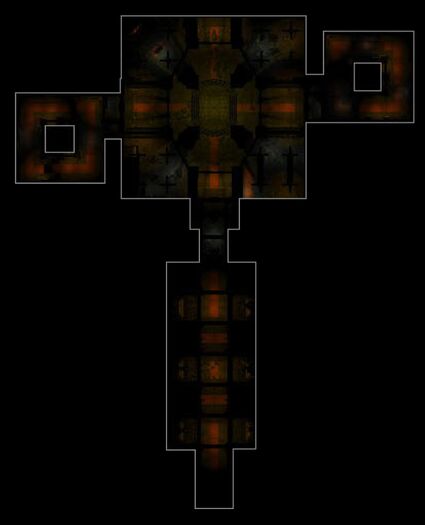
Gwathrenost, the Witch-king's Citadel map
-

Gwathrenost, the Witch-king's Citadel map
-
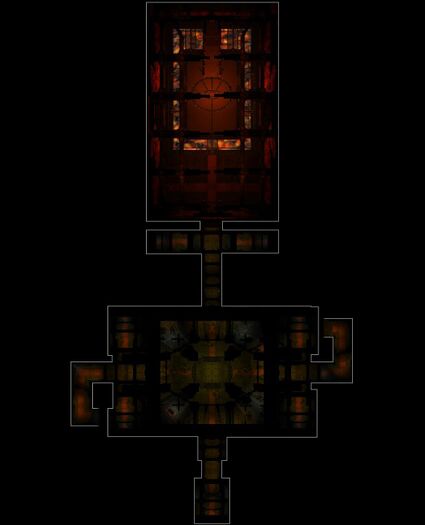
Gwathrenost, the Witch-king's Citadel map


![[72.7N, 31.2W]](/wiki/File:Ephel_Angren_map.jpg)
| Angmar Reborn Instances
| ||
|---|---|---|
| Small fellowship: | Sant Lhoer, the Poison Gardens • Thaurisgar, the Vile Apothecary | |
| Fellowship: | Sagroth, Lair of Vermin | |
| Raid: | Gwathrenost, the Witch-king's Citadel | |
| Settlements and Landmarks of Ephel Angren
| ||
|---|---|---|
| Settlements: | Bail Avarc | |
| Landmarks: | Bâr Heledh • Gwathrenost • Sagroth • Sant Lhoer • Thaurisgar | |
| Instances: | Gwathrenost, the Witch-king's Citadel • Sagroth, Lair of Vermin • Sant Lhoer, the Poison Gardens • Thaurisgar, the Vile Apothecary | |