Barad Guldur
| Level: | 65 - 150 |
| Size: | 12-person Raid |
| Cluster: | Tower of Dol Guldur |
| Region: | Mirkwood |
| Area: | Dol Guldur |
| Location: | [13.9S, 42.2W] |

"Barad Guldur is the chief tower of Dol Guldur. From here, the Necromancer once viewed Greenwood the Great. Now the Lieutenant of Dol Guldur forays from this perch in search of the Company of the Ring..."
Location
Barad Guldur is a 12-man raid in Dol Guldur in Mirkwood. [13.9S, 42.2W]
The name of this instance is Sindarin for "Tower of Dark Sorcery". The nearest summoning camp is at Helethir.
Deeds
Quests
Mobs
The following creatures are found within this instance:
Bosses
| Level | Name | Difficulty | Species | Morale |
|---|---|---|---|---|
| 68 | Dúrchest | Shade | Arch-nemesis | 644,875 |
| 68 | Twins of Fire and Shadow (Cargaraf and Morgaraf) | Men | Arch-nemesis | 451,413 |
| 68 | Lieutenant of Dol Guldur | Unseen | Arch-nemesis | 500,000+ |
Others
Walkthrough
The Gauntlet
After fighting the initial Armour sets and engaging the next set of mobs you will trigger the gauntlet. This means that enemies will be repeatably spawning in front and behind you as you move up the stairs. This means that you have to move through the trash groups quickly so you won't be overwhelmed. Also make sure that you have your off-tank watching the backside of your group so he can aggro anything that comes behind your group. Keep moving in a circular motion up the tower. If anyone dies you will most likely have to leave them for now, otherwise you have a higher chance of getting overwhelmed. once you get to the top with another pair of Armour sets you can stop and heal up, quickly. Once you defeat the Armour sets the gauntlet ends. Enemies will stop spawning and you can send a healer down to rezz anyone that died. You now have 45 minutes to defeat Dúrchest before the gauntlet resets. This means that if you wipe after 45 min. you have to do it all over again.
Note that the above is a reasonable way to explain how tier 2 works. On tier 1 there are mostly just the initial adds unless you are very slow, and none spawn behind you. You should be able to move very quickly up the stairs killing things as you go.
Dúrchest
Main tank will hold near the wall at the end of the red carpet. Off-Tank needs to be close to the boss as well. The Tank will receive a Debuff that slowly reduces his threat over time. All DPS needs to be aware of this and be careful on the ammount of DPS they are providing. Even a critical hit of 500 or less when the debuff is high will cause the boss to pull off of the tank(s) and most likley one-hit a non heavy armour classes. Tanks should work to trade aggro with each other to keep the boss on them. Periodically, and add will spawn, and the third off tank needs to hold it while it is burned down. DPS is then redirected back at the boss. If anyone dies during the fight, Dúrchest will gain a 200k Morale boost each time. Several deaths early on almost assuredly means a wipe. After the adds cease, 5 in all (10 with challenge, pull the lever to spawn one), the boss can be burned down and defeated.
Additional way to tank Dúrchest: When starting the fight have 2 heavies (not the tank) head in front of Dúrchest and get aggro. Wait till the aggro debuff on the gets to about 50% on them, then have the tank run in and get aggro on him. The maximum the debuff can reach is 210% over 3 players meaning that the 2 "decoys" will have -80% and the tank will have about -40%. Follow the same DPS and add procedures as above.
Boss 1 to 2 Transition
Add Types: Wargs- Mostly Stealthed, will pounce someone, stunning them and hitting for ~5k, if they walk into there aggro radius, therefore it is best to either send a heavy out as bait with SI on them, or attack it purposely. Most of the Wargs are attached to sorcerers.
Sorcerers- Dangerous. They have a CC immunity corruption that cycles on and off. They also call out eyes which drop puddles. Recommend Pulling Warg attached to them, and then having them CCed until all others are dead, then have everyone focus on him and nuke him all at once. Use long stuns or CJs to limit his attacks while you finish him off. If you are having difficulty keeping him CCed because of the corruption, CC the warg instead, but everyone needs to be quick to take out the sorceror. Anyone who gets an eye should run to the nearest wall that won't drop the puddle in the middle of a walkway.
Armor Sets- There exact skills are determined by what type of armor they are (Shadow, Flame, Lightning) and what weapon they are holding (Sword, Axe, Mace):
- Axe: These have a huge 360-degree AoE radius(like 10m+) and almost all their attacks are for 3-6k and knockback. So only the tank should be standing near to them, all range should be very far away (preferably 15m+) and the melee shouldn't be near unless the healers can handle it.
- Debuff inflicted: Frail (sets armour value to 0)
- Sword: These have a frontal AoE that does distributed damage. Stick the tank(s) and captain(s) in front of them to minimize the damage taken by a single heavy.
- Debuff inflicted: Traumatic Wound (multiplies max morale by 0.7; can stack if there are two Swords)
- Mace: These don't have any positioning concerns, but they need to be tanked by two people due to their threat drop debuff - a hunter works well if they're far enough away that the Mace won't reach them before it wears off the main tank. Note that if the Mace is paired with another armor, the tank who gets a debuff won't be able to hold either of them, so you may want to tank them separately or kite one until the other is killed.
- Debuff inflicted: Non-threatening (-100% perceived threat)
- Shadow: Can Fear a player.
- Corruption: Corrupt Defences (-10% incoming damage) (before Twins)
- Corruption: Vile Power (+10% melee damage) (after Twins)
- Flame: Does a distributed AoE on a random target. Melee should stay grouped up next to it; ranged should stay grouped up at a safe distance (15m+) to avoid the explosion damage they do on death.
- Corruption: Vile Haste (-10% attack duration and skill inductions)
- Storm: Does a large AoE that stuns. Ranged should stay as far back as possible, and keep stun immunity on healers and melee.
- Corruption: Vile Energies (+10% tactical damage)
After you kill Dúrchest the elves move up. Killing him completes a quest that can be turned in by one of the elves. A bard and repair-vendor also come up stairs. The bard is on the 2nd floor and the repair-vendor and quest-giver is in Dúrchest's room. After you go through the portal you enter the 2nd leg of "trash" mobs. The important thing here is too have a hunter with Heightened Senses Traited or an LM with improved Stealth Detection. This will allow the hunter(or LM) to track the invisible wargs that roam around. Coming Soon Twins Guide:
And you keep climbing after that. Guldur-lights will give you fear and send you running into mobs until you reach the top of the tower and go outside. Once outside you find 2 levers along the buttress ring and pull both, The Lieutent of Dol Guldur's door will open and you can fight the last boss up the outside stiars at the tippy top of the tower.
Level 85 Loot
Gear (Dol Guldur shared)
![]()
![]()
![]()
![]()
![]()
![]()
![]()
![]()
![]()
Tier 2 Challenge![]()
Other
![]()
![]()
![]()
![]()
![]()
![]()
![]()
![]()
![]()
![]()
![]()
![]()
![]()
![]()
![]()
![]()
Dúrchest
Gear
![]()
![]()
![]()
![]()
![]()
![]()
Cargaraf and Morgaraf
Gear
![]()
![]()
![]()
![]()
![]()
![]()
The Lieutenant of Dol Guldur
Gear
![]()
![]()
![]()
![]()
![]()
![]()
![]()
Gallery
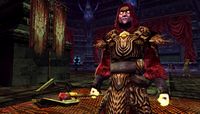
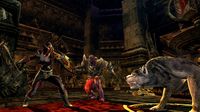
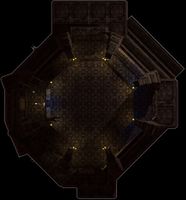
- Views of Barad Guldur.
-
-

-
-

-


- Note: These in-game screen-shots come from lotro.com
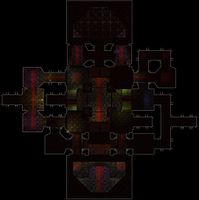
- Maps of Barad Guldur.
-
The first level.
-
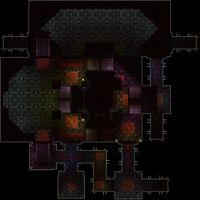
The second level.
-

The third level.
-
The fourth level.
-
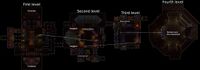
Annotated map.
_map.jpg)
_map.jpg)
_map.jpg)
_map.jpg)

![[13.9S, 42.2W]](/wiki/File:Mirkwood_map.jpg)
| Dol Guldur Instances
| ||
|---|---|---|
| Small fellowship: | Sword-hall of Dol Guldur • Warg-pens of Dol Guldur | |
| Fellowship: | Dungeons of Dol Guldur • Sammath Gûl | |
| Raid: | Barad Guldur | |