The Mirror-halls of Lumul-nar
| Level: | 58 |
| Size: | Small Fellowship |
| Cluster: | Scourge of Khazad-dûm |
| Region: | Moria |
| Area: | Zirakzigil |
| Location: | [15.4N, 108.5W] |

"To bring life back to the gardens of Moria, the Iron Garrison has crafted great mirrors and placed them upon the pinnacle of Zirakzigil. The light has failed, however, and the dwarves seek to learn why their mirrors do not reflect it as they once did."
Location
The entrance of the Mirror-halls of Lumul-nar is in Zirakzigil [15.4N, 108.5W]. From the Twenty-first Hall, head north to Jazargund. Go to the Stone Hall, take a left towards Tharâkh Bazân, follow the road, and turn right at the first junction. Turn right, then left, and enter the door to The Peaceful Path. Exit the The Peaceful Path towards Zirakzigil, head right, and walk over the remains of Durin's Bane. At the end of the road, you can find the entrance to The Mirror-halls of Lumul-Nar [15.4N, 108.5W].
Overview
Lumul-nar is a three-player, three-boss instance which takes about an hour and a half to complete (longer for the challenge). Traversing it requires the manipulation of a puzzle-like network of mirrors and beams of light.
This is also the same area used in the Instance Vol II, Book 8: The Scourge of Khazad-dûm -- A Relic in Lumul-nar.
Quests
Click [-] to contract a list of quests found within the instance.
Deeds
Click [-] to contract a list of deeds found within the instance.
Creatures
Click [+] to expand a list of mobs found within the instance.
Bosses
Walkthrough
There are several mobs in the instance with unique properties:
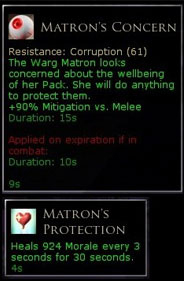
- Frost-warg Matron: possesses a corruption that, if not quickly removed, will cast a very powerful AoE HoT on mobs.
- Swarming Bat: periodically summons swarm-type bats, up to a maximum of 12-15, so they must be killed quickly.
- Morroval Task-mistress: has her outgoing damage multiplied by 10 after 45 seconds of combat, so she absolutely must be killed before then.
Entering the Instance

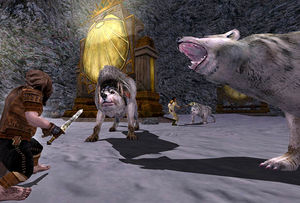
When you enter the instance you will need to jump down a series of ledges until you reach the landing just above ground level. You will be able to see two Ravaging Frost-wargs to the left and right of you, and a Frost-warg Matron wandering between each group of Wargs. Attack the Frost-warg Matron when she's in-between each group.
The Matron inflicts frost wounds - get a Rune-Keeper to protect against wounds or use an infused healing draught/salve (or Lore-master's cure) to remove the wound immediately as it inflicts a lot of damage.
During this fight you will see a flashing corruption - an eyeball symbol - appear on the Matron (see screenshot on the right). If not removed, the Matron recovers about 900 morale every few seconds.
After the Matron is dead, take out the Ravaging Frost-wargs to the right. The ones on the left may be avoided.
Once the coast is clear, there will be a mirror with a lever next to it. Pull the lever to remove the web over the entrance, and head inside.
First Boss: Frost-tail: This is the entrance to the first boss fight: 2 Matrons and the 100k+ Warg-Boss called Frost-tail. The Matrons can be killed before the boss is aggro'd; if they aren't, the fight should definitely be reset. The two Matrons must be pulled away from one another or they will heal one another. The fight against Frost-tail is relatively simple; she causes some wounds. Once the battle is won, loot the chest and use the lever on the middle mirror 3x, and the lever on the left-hand mirror once. This opens a webbed doorway through to the next area.
The Cavern with the mirrors
Head down the ramp. At the bottom of the ramp are two Swarming Bats. The Bats are nasty and summon other bats once you're in battle with them. Focus your DPS on the Swarming Bats, and ignore the other adds.
Beyond the Bats is a large cavern. A Morroval Task-mistress wanders close to the cavern entrance. Avoid her - we'll get to her later!
There is a cave mouth with stairs leading up just to the left of the entrance. 3 Morvul-warriors and a bat guard it. Pull the Warriors and add, avoid the Morroval Task-mistress, and then head up the stairs.
At the top of the stairs are two more Swarming Bats. Take them out and continue onwards.
When the tunnel re-emerges into the cavern you'll see a path continuing ahead and a ramp to the right. Head up the ramp. At the top are 2 Swarming Bats, 2-3 Morvul-warriors, and a little bat.
This is a tough little pull/fight. Try to use short inductions, large heals, feign deaths, root pulls, all Green Fellowship Manoevres - whatever you can to survive it.
Kill the Swarming Bats first, then the other adds.
More mirrors await you here! Turn the left mirror once, and the right mirror once.
Head down the ramp and to the right. Slay the Morvul-warrior, Swarming Bat and little bat waiting for you. Proceed through what should be an open webbed door. If it's not open, you've messed up the mirrors on the ramp - slip back and pull the levers until the doorway opens.
Beyond the webbed doorway, head right and up another ramp towards the ceiling. There is a mirror here - pull the lever 3x.
Next, head back to the webbed entrance you just came through. In front of it are a few little steps leading back down to where you entered the cavern. Skip on down...
Now you can fight the Morroval Task-mistress!
Use as much DPS on the Mistress as possible to take her out quickly, otherwise after 45 secs/1 min she'll start inflicting nasty shadow damage attacks that knock you out in 1-2 hits!
Spiral DOWN the ramps, taking out the groups of adds and Morroval Task-mistress you encounter. Eventually you'll reach a platform with three mirrors. Kill all the adds here, and:
- Turn the left mirror once.
- Turn the middle mirror 3x.
- Turn the right mirror once.
The webbing at the bottom of the cavern will disappear after this - jump on down and you will face the second boss encounter.
You can walk down side paths also. At the bottom of the path is another mirror -- rotate it to open the passage to the next mirror. (As you rotate it, the passage you came down will close behind you.)
As you walk towards the next mirror, you must jump down to reach the passage leading to the central mirror works. Follow the boardwalk spiraling downwards. The Gift of Gorothúl is on this level.
Second Boss
Once you jumped down you will face a Morroval Task-mistress and a Morvul-defiler.
Slay the Morroval Task-mistress 1st, Morvul-defiler 2nd. Crowd control skills such as fear/root/mezzes work on the Defiler to immobilise her for awhile.
The Morvul-defilers possess a +75% immunity corruption to melee, ranged and tactical damage! Corruption removal skills dispel this buff.
Once completed, turn the mirror in the centre of the room 2x, walk through the now opened webbed door, and loot the chest!
Final Boss: Ergoth

The last platform
Follow the ramps down to the mirror platform. There are even more mirrors here to realign!
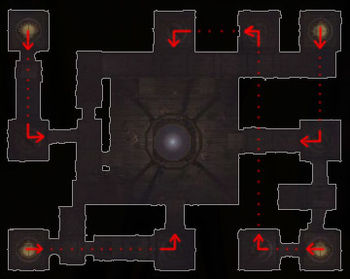
In the centre of the platform is a web that needs to be opened by positioning the mirrors correctly. The picture shows a possible solution for how the mirrors need to be positioned.
There will be 1 Mistress wandering around down here (look for the side of the room with corrupted mirrors, good indication she's there). Once you find her, do NOT aggro her, another will just spawn in her place a little bit later.
What you want to do is let her come to the middle of the room, and then have 1 person get just into range of her; it will say something like "The Morroval-Task-mistress threatens to attack". As soon as you see this, back up. wait a second, and move forward until you see the text again and then back up. If done correctly, the mistress will be stuck in one spot threatening a person, but never aggroing them. The other two people can go around to the four sides and fix the mirrors there.
These mirrors are a bit tougher to figure out - there are actually two different viable combinations. Three sides should be clear of Defilers, but one side should have a Defiler at each mirror; you'll have to have the two people kill them before fixing the mirrors. Once each mirror is correct, the Mistress will disappear.
Boss fight
The final boss Ergoth involves alternating waves of fighting just the boss for about 20-30 seconds and then dealing with about sixteen swarm adds that run in from the sidelines.
You will need to jump down into the hole, and will land on a giant mirror. The mirror is highly polished and slippery - you will see your movement rate halved by this.
This battle is broken into two cyclic phases: Ergoth, and her minions.
- Phase One: Fight Ergoth; have your DPS and crowd control members attack the boss, and your healer focus on healing the party. Ergoth inflicts nasty wounds - use an infused healing draught/salve to remove them asap!
- Phase Two: The Adds; There are 4 types of adds - Morvul Blood-drinker, Morvul-creeper, Morvul-tough and Morvul-stalker... In order to achieve Challenge Mode, ONE OF EACH TYPE OF ADD must remain alive! Have your DPS and/or crowd control kill adds, but leave a few alive. Your healer will either be running around kiting adds to stay alive, or healing their Fellows (if necessary). Phase Two becomes easier as the adds begin to thin out.
- When Ergoth is between half and about 10k morale, she'll heal a lot after each add phase, cue up all damage bonuses and everyone use big damage skills to knock her down enough to get past that point. (There's no induction, it can't be interrupted, just have to burn through itn with lots of damage.)
Loot
Gallery
Note: These in-game screen-shots are officially released and posted on Lotro.com
| Settlements and Landmarks of Zirakzigil
| ||
|---|---|---|
| Settlements: | None | |
| Landmarks: | The Broken Cleft • Durin's Bane • Mukhful Thurkh • The Searchers' Eyrie | |
| Interiors: | The Peaceful Path | |
| Instances: | The Mirror-halls of Lumul-nar | |


