The Mirror-halls of Lumul-nar
| Level: | 58 |
| Size: | Small Fellowship |
| Cluster: | Scourge of Khazad-dûm |
| Region: | Moria |
| Area: | Zirakzigil |
| Location: | [15.4N, 108.5W] |
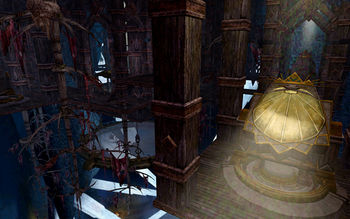
"To bring life back to the gardens of Moria, the Iron Garrison has crafted great mirrors and placed them upon the pinnacle of Zirakzigil. The light has failed, however, and the dwarves seek to learn why their mirrors do not reflect it as they once did."
Location
The entrance of the Mirror-halls of Lumul-nar is in Zirakzigil [15.4N, 108.5W]. From the Twenty-first Hall, head north to Jazargund. Go to the Stone Hall, take a left towards Tharâkh Bazân, follow the road, and turn right at the first junction. Turn right, then left, and enter the door to the Peaceful Path. Exit The Peaceful Path towards Zirakzigil, head right, and walk over the remains of Durin's Bane. At the end of the road, you can find the entrance to The Mirror-halls of Lumul-Nar [15.4N, 108.5W].
Overview
Lumul-nar is a three-player, three-boss instance which takes about an hour and a half to complete (longer for the challenge). Traversing it requires the manipulation of a puzzle-like network of mirrors and beams of light.
This is also the same area used in the Instance Vol II, Book 8: The Scourge of Khazad-dûm -- A Relic in Lumul-nar.
Quests
Click [-] to contract a list of quests found within the instance.
Deeds
Click [-] to contract a list of deeds found within the instance.
Creatures
Click [+] to expand a list of mobs found within the instance.
Bosses
Walkthrough
There are several mobs in the instance with unique properties:
- Frost-warg Matron: possesses a corruption that, if not quickly removed, will cast a very powerful AoE HoT on mobs.
- Swarming Bat: periodically summons swarm-type bats, up to a maximum of 12-15, so they must be killed quickly.
- Morroval Task-mistress: has her outgoing damage multiplied by 10 after 45 seconds of combat, so she absolutely must be killed before then.
Entering the Instance

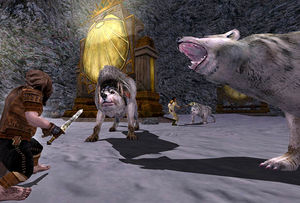
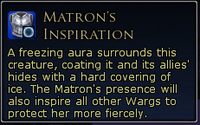
When you enter the instance you will need to jump down a series of ledges until you reach the landing just above ground level. You will be able to see two Ravaging Frost-wargs to the East, and two to the West, and a Frost-warg Matron wandering between each group of Wargs. Attack the Frost-warg Matron when she's in-between each group or her Inspiration aura will grant the Matron's Presence buff to nearby wargs.

The Matron inflicts frost wounds. It is recommended that the Invigorating Warmth buff from the Sâri-surma instance be picked up before entering the Mirror-halls. Remove the wound with a draught/salve, or a Lore-master's ability, or have a Rune-keeper prevent the wound.
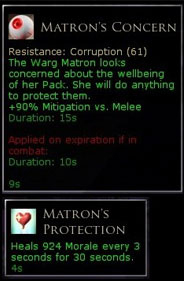
The Matron has a corruption (Matron's Concern) which, if not removed, will pop an AoE Matron's Protection on all nearby wargs, recovering a little over 900 morale every three seconds. After the Matron is dead, kill the wargs on the East at position A. The other wargs may be avoided. There is now a teaching moment at A where you learn that if you pull a mirror lever, the mirror rotates and the resulting reflected light beam destroys the cobwebs barring your way. Pull the lever to remove the web over the entrance and head inside.
First Boss: Frost-tail
There are two Matrons (who will give each other the Matron's Presence buff) and the Nemesis-level Warg-Boss Frost-tail. The Matrons can be killed before the boss is aggroed; if they aren't, the fight should definitely be reset. If possible, the Matrons should be pulled apart from each other just in case they resist corruption removal and pop their AoE heal on each other. Frost-tail causes "deep wounds", ice wounds, has a 2-second knockdown ability, and occasionally hobbles a person and reduces their run speed. Once the battle is won, loot the chest and use the lever on the mirror at position B three times, and the lever on the left-hand mirror (position C) once. This opens a webbed doorway through to the next area, and the group should walk/jump down at position D. It is possible to fall all the way down and not die, as long as a person lands on the mirror at the bottom. If a person falls all the way to the ground, they will die.
The cavern with the mirrors

The first mobs encountered are two Swarming Bats. They will summon allied bats unless cc'd or instantly killed. They also have a stun ability. As long as the Swarming Bats are alive, they will continue to summon more bats, so it is recommended that they be killed first -- ignore the adds.

Beyond the Bats is a large cavern. A Morroval Task-mistress wanders close to the cavern entrance. Avoid her. She has a removable corruption which, if not removed, will increase her damage 1000%.
There is a stone passageway with stairs leading up just to the left of the entrance, at position E. 3 Morvul-warriors and a bat guard it. Pull the Warriors and add, avoid the Task-mistress then head up the stairs. At the top of the passageway are two more Swarming Bats. Take them out and continue onwards.
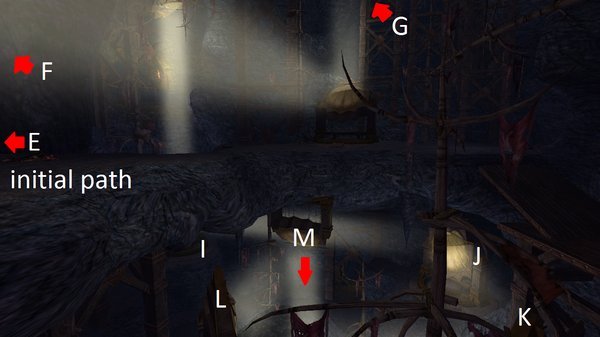
When the passageway re-emerges into the cavern you'll see a path continuing ahead and immediately to your right is a ramp. Head up the ramp to position F. At the top are 2 Swarming Bats, 2-3 Morvul-warriors, and a little bat. This is a tough little pull/fight. Try to use short inductions, large heals, feign deaths, root pulls, all Green Fellowship Manoevres - whatever you can to survive it, as the bats will stun, summon more bats as long as they're alive, and the Warriors deal a fair amount of damage. Turn both mirrors here once. This will open the path for you at position G.
Head down the ramp and continue onward where a Morvul-warrior, Swarming Bat and little bat are waiting for you. Proceed through the open webbed door at position G. If it's not open, you've messed up the mirrors at position F -- go back and pull the levers until the doorway opens. Take a very sharp right and follow the thin path to position H and pull the mirror lever three times. Jump down and make your way to the mirror at position I, turning that mirror once.
Go down the ramps, taking out the groups of adds and any Task-mistress that you encounter. Eventually you'll reach a platform with three mirrors (position J, K, L). Kill all the adds here, and then J once and L once (leave K alone). You will now be able to jump down the hole at position M.
The corruption

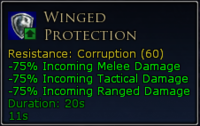
You will land at position N (or you'll walk down a passageway to this spot), where you will face a Morroval Task-mistress. When she is aggroed, she will utter a piercing shriek and spawn a Morvul-defiler at the mirror, corrupting it (moss will cover it and light will not reflect from it). If the Defiler is killed, and the Task-mistress is near the mirror, another Defiler will instantly respawn there and aggro. It is recommended that crowd control skills such as fear/root/mezzes be used on the Defiler so that the group may focus on killing the Task-mistress before 45 seconds have passed and the Task-mistress's damage increases. The defiler has a removable corruption, Winged Protection, which gives -75% to all incoming damage. Once the fight is over, turn the central mirror twice and go loot the chest at position O! Drop down at position P then move on to the beginning of the ramps at position Q. At this point you have a choice. You can either run down the ramps, or you can drop off. Like the initial drop back at position D, if you jump all the way to the bottom at position Q you will die. If you can hit anything on the way down, then you will survive. It is recommended that you walk off somewhat at an angle, aiming for the metal rim which surrounds the central hole. You may bounce off a tree branch on the way. Bouncing off a tree branch or the metal rim will ensure that you survive. It is recommended that you be familiar with the Mightiest Blow quests, Basic, Intermediate, and Expert, which occur during the LOTRO Anniversary Celebration as this will give you practice with controlling your movement while falling through the air, a skill which will also be useful in the final boss fight.
The final mirror platforms


As of Update 17.1 - December 7, 2015, this puzzle is not required in the special solo version of the Quest:Hall of Mirrors: To Befouled Lumul-nar quest. At the center of the main platform is a web which needs all four weaker beams of light which go to the corners of the platform to be redirected to the central web. There are two possible solutions, each of which requires that 19 mirrors be turned.
If you jumped down, you will have a couple minutes to run around and turn mirrors before a Taskmistress spawns. If you ran down, she will already have spawned and started walking before you get there. She spawns immediately to the East of the central hole then walks clockwise around the platforms. When she passes a mirror, she will corrupt it and spawn a Defiler. If you kill her, you will again have a couple minutes before another spawns. When all four beams of light are pointing at the center, the central hole will open and the Task Mistress will not respawn.
The final Boss fight

The final boss Ergoth, involves cycles of fighting the solo boss, then fighting adds while the boss debuffs the group. There are four types of adds, and four of each type. The challenge is to leave one of each type alive (the original challenge was to not kill any adds, and they were usually kited during that phase -- a rather difficult proposition given that massive dread in those times made a person rooted, and Ergoth had a fear which could root for ten seconds. After a few months, Turbine changed the challenge by adding a speed debuff, which made kiting impossible. The new challenge also allowed most adds to be killed. The challenge is to leave one add of each type alive. The mirror is now highly polished and slippery and gives a debuff which will halve your movement rate.
This battle is broken into two cyclic phases: Ergoth and her minions.
- Phase One: Ergoth. Have your DPS and crowd control members attack Ergoth, and your healer focus on healing the party. Ergoth has several attacks/abilities. The Hide of the Bat buff reduces all incoming damage by 50%. The Bloody Sustenance buff reflects all damage directed at her by 50%. She can place a Mortal Wound, is Protected from Slows, and can cast Suppressed Fear which lowers morale by a small amount and then if not removed after ten seconds roots the person for 10 seconds and silences that person. She can also cast Terror of the Bat which will slowly add +10 dread, then slowly wear off. And finally, she has a knockback ability. It is recommended that Ergoth be positioned such that Ergoth is closer to an edge than the tank is, so that when the tank is knocked back it will not be off the edge of the platform.
- Phase Two: The Adds. There are 4 types of adds - Morvul Blood-drinker, Morvul-creeper, Morvul-tough and Morvul-stalker. The Blood-drinkers, Creepers, and Toughs are melee and will all run up to the players. The Stalkers are ranged and will hang back. In order to achieve Challenge Mode, ONE OF EACH TYPE OF ADD must remain alive! Have your DPS and/or crowd control kill adds, but leave at least one of each type alive.
- When Ergoth is between half and about 10k morale, she'll heal a lot after each add phase. There's no induction and the heal can't be interrupted. Do your best to damage her as much as you can each time you can fight her. If you have big attacks on long cooldowns, this is the time to use them.
Loot
Gallery
Note: These in-game screen-shots are officially released and posted on Lotro.com
| Settlements and Landmarks of Zirakzigil
| ||
|---|---|---|
| Settlements: | None | |
| Landmarks: | The Broken Cleft • Cirith Caradhras • Durin's Bane • Mukhful Thurkh • The Searchers' Eyrie | |
| Interiors: | The Peaceful Path | |
| Instances: | The Mirror-halls of Lumul-nar | |
| Lothlórien Instances
| ||
|---|---|---|
| Small fellowship: | The Mirror-halls of Lumul-nar • The Water Wheels: Nalâ-dûm | |
| Fellowship: | Halls of Crafting | |
| Raid: | Dâr Narbugud | |


